Wednesday, June 20, 2012

My 19th Century Dresser!

I'm so flipping excited with how well this dresser turned out.  It was my first time using modge podge, but overall it went well!  I got this idea from Miss Mustard Seed and her sheet music dresser.  Then I found a book at Goodwill for $2.50 with all the famous 19th century photojournalism pictures in it! 

Anyways! I finally finished this after it sat in my garage for nearly a year!  I got the dresser at a garage sale down the street for $15!  Score!  It was truly and actually an old Army Officer's Dresser which TOTALLY adds to the character of it all!  I've been told I could see this for upwards of $300+, but I'm so in love with it that it's not going anywhere but my craft room for me to "oooh" & "aww" over!  :)

Oh, and US history is my favorite thing to learn about and so I know what 95% of the pictures are from! :)

BEFORE...

 AFTER!!!

 What do you think?!  Does anyone love it as much as I do?!  :D

Ok... here was my process!

First, it was pretty old, so I did a decent cleaning and wiping down and tightening of some screws!

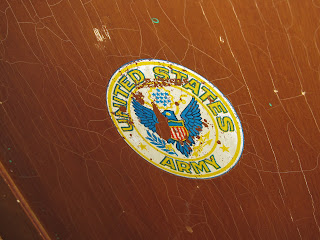
*This is a close up of the Army ?plaque? that was on the front.  The lady at the garage sale told me it's been in her family for generations and that it was actually an Army Officer's dresser in WWII! (Now, who knows if that's actually true, but I'd like to believe it is!)

Then I primed it and once that dried, spray painted it with Krylon Ivory.
After all the painting was done, I sanded the edges to give it an antiqued look! 
  

This is the book I found at Goodwill for $2.50.  When I saw it there, I knew EXACTLY what I wanted to do with it!
  

After I cut out all the pictures I wanted to try and use (there were some that didn't make the final cut), I organized them to the way I wanted them on the dresser!  I then Modge Podged them on.  I did this based off Miss Mustard Seed's tutorial on her blog.
  
After all of this, I then used a dark walnut wood stain to wipe on and wipe off (immediately) to give the dresser an old aged wood look! I then let the stain dry for 24 hours just to be sure!  (I did not put stain on the pictures, FYI.)

....and VIOLA!

  
(*oh!  I also bought new knobs on clearance at Hobby Lobby for $2/each since the old ones were missing and falling off!)


Here is a close up of all the pictures I put on it!
  
Do you recognize any or all of them?!

 
So...what do you think?!
I'm in love with it...

Monday, March 5, 2012

Urban Letter Signs

For Christmas this year, we were on a STRICT budget! Being "house-poor", we had to find gifts that were budget friendly, but "blog-worthy"! I think I did a pretty good job!

We decided to make these super cute Urban Letter Signs, that I've seen ALL OVER THE PLACE! So, thankfully to my WONDERFUL friend, Pinterest, we accomplished some REALLY fun signs!

First of all, I found this website, that has TONS of free pictures of letters that you can download, edit and get printed!

Then, I found this "pin", that showed a cute (& cheap) way to make the signs!

Materials:
4x6 frames at the $1 store
1x10 piece of wood from Home Depot
Spray paint (which of course, I had on hand)
Wood stain (of course, also had on hand)

First: Choose your letters. This can be both fun and difficult! So many to choose from!


{This first picture is using the website, picnik.com to make a collage, you could easily just do that and then print this}

Second: Paint your board, distress it if you want. Also, paint your frames if you don't like the wonderful wooden $1 store ones!

Third: Stain your board. You do this by using a sponge brush, painting on the stain and then wiping it off with a clean rag. This gives it an old look. So fun too!

Forth: Put your printed pictures in the frames

Fith: Glue on the frames to the board!

Sixth: Drill holes in the back for you to hang it up! (optional)

Then VIOLA!

Aren't they pretty?!


They really aren't hard at all! Plus, our Christmas presents became quite the envy! Maybe I should make these and sell them?! Hmm... ;)


Saturday, January 14, 2012

My (free) piano!!!

**UPDATE: This piano is a LOOK-A-LIKE to mine in the garage. I have NOT painted mine yet. This is just the same upright with the same carvings and such LIKE mine. Again... this is NOT my handy-work."**

So THIS PIANO (minus the color...which btw I LOVE) is the piano I got off Craigslist for FREE!!! I found this on Pinterest! (Again... I love) It's posted on another blog. They did a great job with it! We found a ?sticker? on our piano that says it's a"commemoration of the 400th anniversary of Columbus coming to the America's" Yeah! I googled the piano and its' anywhere from 1895-1905. COOL HUH?! If we refinished it to it's original shape, it would be worth $13,000! The keys are made out of real ivory. Some are chipped and its totally out of tune and sounds like an old saloon piano, but it makes me love it EVEN MORE!
I have plans to do mine with Annie Sloan Old White paint and a dark wax. Don't you think it'll look AWESOME! This is my next project! I'm so excited for this class I'm going to TODAY to learn more about this paint. I get to leave in 2 hours... *sigh* TOO LONG! ;)


Don't call Hoarders!

So I'm trusting anyone who reads this post not to call Hoarders on us. I promise it's not as bad as it looks! Well... kinda.

I have at least 10 projects in my "studio" (aka: the garage) Before we bought our house last , (I can't believe its been almost a year!) we lived with my parents. Them being the wonderful parents they are, they let us store a lot of "really good deals" in their garage!

This was their 3rd car garage before we moved out... It's MUCH better now...

This was our garage about a month after we moved into our place! My wonderful hubby "says" he doesn't mind parking in the driveway. Isn't he sweet? I don't believe him either, yet... I can't seem to clear enough room yet.

I'm taking a class (TODAY!) on how to best use my dream paint... Annie Sloan. Then, if the weather will just cooperate, maybe I'll get my butt in gear!!!

Oh... and our garage looks NOTHING like this now... Different projects have moved in and others have found new homes... Maybe I'll post a current picture. I'll try to find a picture of the beautiful piano I got... for free!


Did I tell you?

I don't think I told you! I was featured on Better After for my kitchen table and chairs! It happened way back in June. I found out while I was on vacation in Hawaii! I was SUPER stoked!


You can view the post here.

I'm the second table. The red one. (Obviously.)


A sneak peak!

So this piece has been a work in progress since September. Not because it's taken me that long to finish it, but because I have 2 kids under 3 and we live in Colorado. Weather sometimes doesn't cooperate when your "studio" is in the garage!

So I thought I would post a "sneak peak" to what I'm doing.

This has been my favorite piece so far... (besides my table and chairs)

I got this old Army Officers Dresser at a garage sale in my neighborhood for $15! I love it.

The lady said it's been in her family since the 40's. Whether or not thats true... :/ Its a good story.

I saw this idea on Miss Mustard Seed to Mod Podge sheet music to the dresser. I LOVED IT! I tried to find old music and for some reason, there's nothing at any of the Goodwills. So I found this book instead for $2.50 and went a different route.

The book is called " TIME Eyewitness: 150 years of Photojournalism"
It's an AWESOME book. I wish they had like 5 of them... I've been looking for them ever since.
With the dresser being from the Army and then the pictures added... wow.
It's turning out AWESOME!

My Grandma who is a professional interior decorator says I should sell it for $300-$400!!!
I don't think I can. I love it too much.

I'll try and finish it fast. Its suppose to be in the high 50's today!

I'm also taking a class today that I got for Christmas on how to use Annie Sloan paint.
I'M SO EXCTIED!
I have big plans for all the paint I'm getting today...


Thursday, August 18, 2011

Add some flair to your front door!

{Before...}


{Middle...}
We painted the door black and got a new decorative mat with a wreath.

{After!!!}

{Then I saw this mossy letter idea I think, at Pottery Barn... it was CRAZY expensive... So I decided to make my own... total cost of supplies $15}

{The 'k' after... It literally took me like 15 minutes to make...}

{I hung it in the middle of our wreath with picture hanging wire}

{THEN, I cut out vinyl lettering on my Cricut (i love that thing) and put it on the front door}

{All together makes for some nice cute flair to welcome your guests, both expected and not!}

Now only to learn how to keep flowers blooming and beautiful all summer long!